Janome Sewing Machine FAQ
On this Janome sewing machine FAQ page, you’ll find answers to many of the most frequently asked questions about Janome sewing machines plus embroidery, quilting, coverstitch, and serger machine questions.Ja
Toews Sewing in Abbotsford BC sells, services and repairs Janome sewing machines including computerized and 100% mechanical sewing machines.
Q: Serging Question: How will the Cloth Guide benefit my sewing with the Janome serger?
A: The Cloth Guide offers simplicity in sewing a uniform seam width. The guide can easily be adjusted to take the guess work out of feeding long pieces of fabric. It is especially useful when the blade is deactivated to guide the fabric when sewing decorative Flatlock or Pintucks. The markings on the Cloth Guide act as an extension of the markings on the Looper Cover (Extension Table A) and the lipped edge allows for fast, easy and precise guiding of the fabric.
Q: Is it absolutely necessary to use only Janome bobbin thread in the bobbin for memory card embroidery, or can I use any standard sewing thread?
A: You should not use standard sewing thread in the bobbin, as it may not be the correct weight for machine embroidery. Superior stitch quality is achieved with Janome bobbin thread. The weight of the Janome embroidery thread [which is 60/2], was designed specifically for embroidery. This thin, smooth, strong thread is the correct weight to use in the bobbin, with Janome Embroidery thread in the needle, for a balanced stitch and professional looking machine embroidery. The incorrect weight bobbin thread can cause the bobbin thread to show on top of your embroidery.
Q: What is the heaviest thread I can use on my Memory Craft for Professional-Style Embroidery?
A: We usually use 50-weight thread for most applications. However, heavy fabrics (denim, bath towels, sweaters, etc.) may need 30-weight thread 80/12 or 90/14 needle to fill the design properly. Metallic threads are available in 30, 40 and 60 weight and all can be used on the Janome Memory Craft machines.
Q: Quilting Question: When I’m using my sewing machine to sew all three quilt layers together, the layers shift and my quilt comes out warped. How can I prevent this?
A: A well-basted quilt is vital to the success of machine quilting. Use safety pins instead of straight pins to baste your quilt, because straight pins come out. Secure the bottom layer of fabric to the table with masking tape, and then add the batting and quilt top. Smooth out the layers and pin every 2 3/4-4″. Start pinning in the center and work out towards the edges. For machine quilting, use a walking foot as it is designed specifically for feeding layers evenly. Reduce the presser foot pressure. Uneven fullness in parts of a pieced top may need extra handling – straight pin along the line to be quilted, removing the pins as you approach.
Q: Why is it necessary to change the sewing needle this often?
A: Needles do become dull after a period of time and use. You will notice this when sewing your project, the stitch will look irregular and the seam may pucker. Also, it is possible for a burr to appear on a needle due to hitting a pin, running the machine too fast, or pushing and pulling the fabric. Both of these problems will result in possible damage to the fabric, which in turn could possibly ruin your project.
Q: Serging Question: When working with knits and other stretch fabrics, I’m not sure what type of stitch is best for construction. I have had trouble with seams stretching out of shape and facings that do not keep their shape.
A: The stretchable qualities of many fabrics make them easy to wear but do require some very specific construction techniques. The 4 thread Overlock serger stitch on the Janome serger is perfect for seams on knits and other stretchables. The 4 thread stitch is preferable to a 3 thread stitch because the 4th thread provides a stable straight stitch by using both needles and an overcast stitch wide enough to give a neat, tailored edge to the inside of your garment. When attaching facings, the Overlock 3 serge stitch will give you a more flexible seam needed for the curves of the neckline and armholes.
Q: Quilting Question: Why does my machine sometimes skip stitches when I’m quilting?
A: Skipped stitches may be caused if the needle is blunt or inserted incorrectly or if it is the incorrect type or shape of needle for your machine. The machine might need cleaning around the feed dog. Rethread the top and the bobbin. For straight stitching, try the needle plate for straight sewing.
Q: I like to finish my hems with a double needle straight stitch, but on fabrics with any stretch, the hems “bubble” out of shape. How can I prevent this?
A: Hems that have a tendency to stretch can be stabilized in several ways. Since each fabric has its own characteristics, it is best to do a test before using any stabilizer on your actual garment. Try one these methods. #1) For sewing machines — Wind your bobbin with woolly nylon and use the “F” foot included with Janome machines. The woolly nylon thread is stretchable and very strong; it will help eliminate puckers. The “F” foot will provide a tunnel for the double needle stitch to feed through. You may also get better results by decreasing the pressure on the foot with the Pressure Release Dial. #2) For sergers — Use the 4 thread serger stitch to serge the raw edges of the hem, then turn up the hem and press with an iron. For many fabrics, this is enough to prevent stretching. If the hem is an “A” line, you will need to set the differential feed to a setting of 1.5 or more to ease in the excess fabric. For very stretchy fabric, iron on a 1/2″ strip of a lightweight lining, such as knit fuse, before serging.
Q: Serger Question: How can I control decorative threads, which wind off the spool unevenly, and cause uneven stitches?
A: Sewing at a consistent speed, a little slower than when using regular thread will help correct this problem. It is also helpful to thread the decorative thread through the extra two upper thread guides when using the double chain looper. Threading through the thread guides normally used for the upper and lower loopers before the upper guide for the double chain looper reduces some of the twisting and uneven dispensing of the decorative thread.
Q: How do I sew buttons on a quilt?
A: You can sew buttons on a quilt the same way you would sew buttons on clothing. If you have a button sewing foot all you have to do is place the button under the foot and select a zigzag, matching the holes on the button and taking the length down to 0.2. Zigzag in place for a few passes. Or select stitch # 17 on the Memory Craft 9000. Note: I would not sew buttons on a child’s quilt.
Q: How do I tell what weight of sewing thread I am using?
A: On most spools of thread you will find various numbers. One of the numbers that appears has to do with the length of the spool. This number appears in meters. Some spools also give the equivalent measurement in yards. Another number that appears on the spool is a pair of numbers, i.e. 60/2. The first number has to do with the weight or thickness of the thread. The larger the number, the finer the thread. The second number indicates the number of strands or yarns that are twisted together to form the thread. In this case we would have a 60-weight thread composed of two strands.
Q: Serger Question: How can I overedge and gather fabric for a ruffle in one step?
A: This is very easy to achieve. Select the Overlock 4, and increase the stitch length to 4.0. Lift the presser foot and dial the Differential Feed Ratio to 2.2. Increase the two needle tensions to 4.6. The seam will automatically gather and finish the edge for an easy ruffle. If more fullness is desired, increase the two needle tensions, or if less is needed, decrease the two needle tensions. This is an excellent customized stitch to memorize for future use.
Q: I like to sew around my buttonholes twice, but often the thread bunches in the middle of the second buttonhole.
A: The pre-set buttonhole length of .45 on the Janome Memory Craft is designed to give enough density to the satin stitch that, for most fabrics, stitching just one time around is enough. If you choose to sew around the buttonhole twice, it is recommended you increase the length to at least 0.5 to allow space for the second round of stitching. Keep in mind that buttonholes which will be used repeatedly, such as ones on a blouse or waistband, need to have some flexibility in order to slide over the button. They need a stitch length that will allow for “ease.” If a buttonhole is used for embellishment, and it will not be used very often, a heavier satin stitch would work. You should always do a test buttonhole on your fabric, including any lining and interfacing.
Q: Sewing Machine quilting question: How do I use an Even Feed Foot? And what is the advantage of using it?
A: An Even Feed or Walking foot is used to keep all layers in a quilt from moving out of position when being sewn. It works in conjunction with the feed dogs to make sure the layers don’t shift. There is usually a quilting bar which attaches to the back of the foot for even spacing between quilting lines. The Even Feed foot is also great for sewing with plaids. It keeps the layers of fabric together so the weave of the plaid remains even while sewing seams.
Q: Serging Question: I’m new to five thread serging. My dealer suggests that when threading the double chain looper,that I allow the thread to hang down in the machine, and that I take the extra step to bring the thread through the left front needle hole, or that I start sewing on a scrap of fabric. Can you explain why?
A: The double chain thread hangs down to insure it won’t tangle with other threads. This thread only forms a stitch on fabric, so it is important that with any stitch that involves the double chain looper, that you start sewing with fabric under the needles, and not sew off the edge of the fabric. When you examine the presser foot A, you’ll see that there is no entry slit for the thread. Starting on a scrap of fabric, or simply touching the needle down/needle up button two times to bring the thread through the front needle hole (and the sweeping the thread back with tweezers) establishes the stitch formation.
Q: While I’m embroidering, my Janome Memory Craft sewing machine often indicates it’s running low on bobbin thread. After checking my supply, it seems sufficient. Why is this happening?
A: The bobbin thread sensor on the Memory Craft is programmed to sense when the bobbin is near empty. Standard thread (dressmaking thread) is usually a 30 weight thread, while Janome bobbin thread is a 60 weight thread. For embroidery, the recommended Janome bobbin thread is finer, therefore, more winds on the bobbin. The sensor is set for standard sewing thread, not finer bobbin thread, which is why it seems to indicate low bobbin thread too soon during the embroidery function.
Q: Every time I wind a bobbin on my sewing machine it is uneven. It looks like an upside-down tornado. What causes this?
A: First, make sure that you have followed the proper threading path for winding a bobbin. Second, make sure that you wind at a medium and consistent speed. Do not floor it, this may be the cause of the bobbin winding unevenly.
Q: I want to topstitch with a heavier thread, but I can’t find a selection of color choices to match my fabric.
A: Two threads can be used through the needle to create a bolder effect when topstitching. Janome Embroidery Thread is available in wide selection of colors, and will work very well for this technique. You’ll need to replace your regular needle with a topstitching needle. This needle has a bigger eye to accommodate the two threads. Place both spools of thread on the separate auxiliary spool pins that are included with the Janome Memory Craft machine. Your thread will “reel” off the spools at the same rate, eliminating thread breakage. The accessory spool stand for the Memory Craft machine is also a perfect tool for this technique.
Q: Serging Question: How do I erase a customized stitch that I previously memorized?
A: You don’t really erase previously memorized information, but rather replace it with new settings. Two screens prompt you to answer that you want to change the memorized setting, and then that you want to memorize the new settings.
Q: Quilting Question: Can I bar tack a quilt?
A: A quilt certainly can be “bar-tacked”. You can achieve this method by marking the quilt at regular intervals. I would suggest no further apart than 5 or 6 inches. The bar-tacking can be sewn with a wide zigzag, stitch length set at 0.2 or a close satin stitch, or you can bar-tack with one of the decorative stitches on your Memory Craft. Just select a stitch, memorize, then select a locking stitch and memorize. Your Memory Craft will just sew on decorative pattern in place. On the Memory Craft 9000, go to the quilting mode and select stitch 158. This will bar-tack the quilt.
Q: Serging Question: I’m using my Janome Pro4DX serger to make scarves. I’m using the rolled hem feature with 3 threads and wooly nylon thread. When I start serging on the beginning edge the first 1/8″ – 1/4″ of my fabric does not get hemmed. It is unfinished as if the thread just didn’t catch that part of the fabric or it was pulled away. How can I prevent this from happening?
A: The problem is that your scarf fabric is very fragile, and while getting started it wants to pull away — and does! Try this: Start serging on a double layer of Solvy (water soluble stablizer) in front of and slightly underneath the beginning edge of your fabric. The seam starts to roll in its formation, and by the time it reaches the edge of the fabric it is holding on to the fibers rather than fraying away. Also make sure you have the blade OUT enough. There needs to be sufficient room to form a seam which rolls, and often a sewer has the blade in too far, and the fabric doesn’t have room to roll before it is cut off.
Q: My bobbin never seems to wind full. There is always a lot of room left. What is wrong?
A: First, you do not want a bobbin to be full to the edges for a couple of reasons. One, it may cause problems with the stitch formation. Second, it may not fit properly in the bobbin case. Most machines have a device that reads the bobbin capacity; yours may need to be adjusted. You may want to check with your dealer.
Q: When I purchase new sewing machine needles they all have two numbers on them. Why?
A: Most single shaft needles have two numbers on them, such as 75/11. The first number is the diameter of the needle shaft, which is the European metric system for sizing needles. The second number is the American system for sizing needles based on an arbitrary number. In both systems, the larger the number the larger the shaft and eye of the needle.
Q: Serging Question: I am trying to make a broomstick skirt on the serger. How can I achieve ruffling on one layer of fabric while attaching it to a second layer of fabric?
A: Janome sergers make this task simple, fast and precise. Try the Gathering Attachment. This attachment gathers the bottom layer of fabric as it is being sewn to the top layer without gathering the top layer of fabric. An arm on the attachment swings between the two layers, pressing the bottom layer against the feed dogs to gather, while the top layer floats free of the pressure. Fullness of the gathers can be adjusted to suit your taste.
Q: Quilting Question: When I am piecing blocks together for quilting, which is the best way to press the seams?
A: There are two ways to press seams when piecing a quilt block. One way is to press the seams to one side, usually to the darkest fabric. This gives the seam strength and durability, but it is also more difficult to quilt if you are quilting by hand. The other way is to press the seam open, which results in a flatter surface for the quilt. First, press the seam as it has been sewn, flat on the wrong side. Then press the seam either open or to one side on the wrong side of the fabric. Last, flip the fabric to the right side and press again to make sure that the seam is completely open. This makes it much easier to match points and seams when joining to the other pieces.
Q: My buttonholes always turn out even except when working close to the neckline. How can I make that top buttonhole look as good as the rest?
A: Neckline buttonholes require more preparation because of the many different layers of fabric used for the collar, collar stand and facings. This is the spot they all come together. It is important that you “grade” your inner seams before turning right sides out. But in many cases this won’t solve the whole problem. If the facings on one side are considerably higher, you need to even out the fabric before it is placed under the buttonhole foot. Use several layers of tear away stabilizer to “prop up” the lower side. This will allow the fabric to feed evenly under the buttonhole foot. This stabilizer will be on the far end of the buttonhole foot and not fall into the stitching area. Think of it like walking with a tennis shoe on one foot and a heeled pump on the other. You need to create a balance for the fabric to move smoothly. Finally, place a single layer of lightweight tear-away stabilizer under the entire area before sewing.
Q: What type of sewing machine thread should I use?
A: Always use good quality thread. Avoid thread spools that appear fuzzy and have slubs. These threads tend to break easily and will cause problems when sewing. Some manufacturers test machines with particular brands. Check your instruction manual to see if your machine works best with a particular thread brand.
Q: When I understitch my facings with a straight stitch, I often get a ridge around the inside edge that does not lay flat. Should I change the length of my stitch?
A: Under stitching helps keep the facing on the inside of your garment and provides a clean edge on the outside. Depending on the weight of the fabric, a lining fabric could be used for your facing instead of your fashion fabric. It is also very important to grade your seams before turning the facings. Instead of the straight stitch, try using the multiple zigzag stitch #9 on the Janome Memory Craft machine . Adjust the width to 3.0. This will allow for the stretch in curved areas. Also, the width of the zigzag will even-out the fabric as you sew, eliminating the ridge you can sometimes get when the straight stitch becomes buried in the fabric layers.
Q: Sometimes thread will “ball up” in the bobbin area of my sewing machine. Normally, my Janome machine has such consistent tension. Can I do something to prevent this?
A: When thread snarls on the underside of your fabric, it’s almost always the upper thread tension that needs attention. There are three very common reasons why the upper thread suddenly seems to go “haywire.” First, if a sewing machine is threaded too quickly, it’s possible to miss threading the take-up lever. The take-up lever is the silver hook that is threaded just before you bring the thread down to the needle. When the thread is not in the take-up lever, it’s like there’s no tension at all. Thoughtfully, Janome has added a “stopper” to prevent the thread from popping out of the take-up lever. Taking a little extra care to get the upper thread past the stopper and all the way into the take-up lever will insure good stitch quality. When changing thread colors for Professional-Style Embroidery, Memory Craft machine owners need to remember to lift the foot between colors. The “P” foot might look like it’s up when the needle is in the highest position, however, if the foot is not lifted, the upper thread will not drop into the tension. When you begin embroidering, the thread will loop on the underside. Allowing the thread to continue to build up in the bobbin area can cause an “overload” situation. Last, but not least; thread quality can dramatically affect your stitching. Poor quality thread will break more easily, create more lint in your machine, and can cause inconsistent tension. The little bit extra you pay for top quality thread will save you hours of frustration. By keeping these three simple tips in mind you will enjoy that wonderfully consistent Janome thread tension.
Q: Quilting Question: I’m new to free-motion quilting by machine. I understand that the feeddogs are lowered and I control the movement of the fabric. But, my stitching looks uneven and doesn’t seem to lock as it should. What am I doing wrong?
A: This problem often occurs with beginners. First make sure that your machine is set up properly for free-motion quilting:
- Lower the feed dogs (good job, you’ve already done one of the most important elements).
- Remove the ankle and screw on the P2 foot. This foot is spring loaded and will assist in the stitch formation. The P2 foot is different from the P foot sed for Professional-Style Embroidery.
- Insert a new needle. A Janome Blue Tip #75/11 is good.
- Place the same thread in the needle and bobbin – the thread type can be Janome Embroidery thread or a cotton thread manufactured for machine quilting. It is not recommended that you use Quilting thread that has been manufactured for hand quilting, since it’s coated with wax.
- Select a straight stitch or, if you are using a Memory Craft Quilting Mode: Free-Motion Embroidery Key, and the machine is automatically set-up for you.
- Now that your machine is set, make sure your quilt is basted well. You can do this by either hand-basting the three layers together or use safety pins made for quilts (regular safety pins may rust). A rule of thumb when basting is to have no area of the quilt un-basted that is larger than your hand. Next, you might want to consider using surgical gloves or gardening gloves that have “grippers” on the palms. This will help you grip the quilt as you are moving it. The last bit of advice is to practice. Free-hand quilting requires a rhythm while sewing. The speed at which you sew is up to you. Relax as you sew and before long you’ll be quilting like the pros.
Q: How important are the spool caps, and how do I determine which size to use?
A: Spool cap covers prevent thread from catching in the spool notch, and assure even delivery of thread. Ordinary spools require the large spool cap, which is larger in diameter than the thread spool, and thinner spools use the small cap cover, which is larger in diameter than the spool, and yet not too large as to impede thread delivery. When using metallic threads, it may be more desirable to stand the spool on the auxiliary spool pin or on an accessory thread stand, with the large spool cap underneath the spool, with the flat side to spool end.
Q: How fast can the Memory Craft 9900 embroider?
A: The MC9900 can embroider 800 SPM. (Stitches per Minute)
Q: Serging Question: Is there an easy way to make spaghetti straps on the serger?
A: Spaghetti straps can be made quickly and easy with a serger. First, set up for a Rolled Hem. Sew a chain 5″ to 10″ longer than the length of the strap. Bring the chain around to the left of the presser foot and to the front of the machine. Take the fabric strip for your strap and fold it right sides together, around the thread chain with the fold to the left. Begin to sew, holding the chain next to the fold of the fabric. The cutting blades will trim away the excess fabric as you sew. Be careful not to cut the chain. When the sewing is complete, pull the thread chain to turn the strap to the right side.
Q: Serging Question: Can I create wire edged ribbon on the Janome serger?
A: Wire edged ribbon can be created on the Janome serger using the Rolled Hem 3 stitch and Cording Foot 1 available in Attachment Set A. Bridal Wire is recommended as it is wrapped with white fabric. This wire can be found in the bridal section of craft and fabric stores.
Q: Can you give me some guidance in choosing the correct type of interfacing? I’m not sure what kind I should use for various projects and fabrics.
A: Choosing the correct interfacing for the fashion fabric you are using will help you provide shape, body and support. You will want to compare and try several weights in order to select the kind that will give you the drapability and durability you need. Interfacing Tips: · Hold the two layers (the fashion fabric and the interfacing) together to test for compatible draping, weight, color, and fabric care. · Fusible interfacings have made the process very easy and are a good choice whenever possible. Fusibles often change after fusing, so it’s important to test for appearance, drape, and care. · Woven fusibles generally work best with flat fabrics, and non-wovens work best on textured fabrics. · When ironing interfacing, it’s important to lift the iron to move it, instead of sliding. Also, follow the manufacturer’s directions, including the amount of time needed to fuse. · TEST TEST TEST !!! No matter which interfacing you use, your garment will look better with it than without it.
Q: Quilting Question: How can I make the quilt stitches #122 (MC9000) and #157 (MC9000) longer when my length key only goes up to 2.5?
A: When machine quilting using stitches #122 or #157 on the Memory Craft 9000, the default length setting is 2.5 and will not go higher. You can increase the look of both these stitches by increasing your tension to between 7.4 and 8.2. This added tension brings up more of the bobbin thread giving the look of a longer stitch. The New Sculpture stitch, #157 on the Memory Craft 9000, makes a lovely Sashiko stitch which is used on Oriental quilts or garments.
Q: I am forever forgetting what needle I have placed in the sewing machine and can not read the information on the needle. Do you have any tips?
A: Actually we have several. The first is, the top of the Schmetz needle packages contains a magnifier. Place the needle so that the shank is in this area. Now it is easy to read the needle size. Another is to write the information down on the pattern envelope along with fabric and thread used. This will also be a good reference for future use when using this pattern. Other hints are to place the package that the needle originally came from in the pattern envelope or place a note with the needle size on your machine.
Q: When using an adhesive back stabilizer, does the adhesive affect the needle and my Janome machine performance?
A: Due to the superior tension and consistent needle penetration of the Janome machines, there are very few problems with an adhesive back stabilizer. To assure consistent stitches when your needle becomes sticky, replace the needle. Depending on the size of your project, you may incorporate the use of a silicone-based needle lubricant
Q: What does the Trace Outline do?
A: The Trace Outline moves the needle in square outline over the perimeter of the design or if a basting option is selected, it will baste around the perimeter of the design for extra stability.
Q: I have been experiencing skipped stitches on my sewing machine lately. Do you have any ideas as to what may be causing this?
A: First check to make sure that the needle is inserted correctly and at the highest position. If that does not solve the problem, change the needle. You may have a dull needle or you may have a burr on the needle. If you continue to have skipped stitches you may have the wrong type or size needle for this project. Change the thread you are using. Thread quality does make a difference in stitch formation. By doing these few simple things, the problem will be corrected.
Q: What thread do you recommend for your Janome sewing machines and sergers?
A: Cheaply made thread can affect the performance of your Janome machine (not to mention the headaches you’ll get). That’s why Janome put many years of sewing machine experience into making a line of exclusive sewing threads. Janome offers a variety of threads for precision Professional-Style Embroidery, serging and regular sewing. Ask your Janome dealer to show you the entire line.
Q: I love the look of the metallic threads. I recently bought a spool and have been experiencing some problems. The thread seems to break every few stitches. What should I do?
A: We suggest using the vertical spool position on your sewing machine. Also, use either an embroidery or metallica needle. These needles have a larger eye and deeper groove, which helps threads from breaking or splitting and helps prevent skipped stitches.
Q: When sewing on lightweight fabric, I have trouble with the seam puckering. What can I do?
A: Lightweight fabric can sometimes create difficulties. Try some of the following suggestions.
- Change to a size 9 fine needle.
- Shorten the stitch length to between 1.5 to 2.0 (normal is 2.2).
- Make sure the bobbin is in the bobbin case or holder correctly.
- Use a straight stitch foot. This foot has a flat bottom and a single needle hole in the center of the foot. This will help support the fabric around the needle to prevent puckering.
- To further support the fabric, try a straight stitch needle plate.
- It may also be necessary to loosen the upper thread tension.
Before the invention of the straight stitch foot and straight stitch needle plate, sewists placed tissue paper on the bottom and top of the seam. After the seam was sewn, the tissue paper was gently removed. Today, water soluble stabilizer can be used instead of the tissue paper.
Q: I would like to have tighter gathers when I use the Gathering foot. How can I do this?
A: Set up your machine for gathering by increasing the stitch length to 5.0 and placing the needle thread tension to between 6 and 9. Attach the Gathering Foot. Place the fabric under the foot. Using the fingers on your left hand, hold the fabric against the rear of the foot as you sew. By holding the fabric against the foot with light pressure as it comes through the feed dogs, lovely tight gathers will result. Release the fabric every 4 to 5 inches and then apply the pressure again.
Q: I recently bought a book on Heirloom sewing. The book mentioned a wing needle but did not provide a description or picture. What exactly is this and can I use this on my machine?
A: The best way to describe this needle is a needle in which a wing appears on each side of the needle shaft, or simply a needle that appears to have been flattened. The wings, upon entering the fabric separate the fibers creating an open area or hole commonly seen in heirloom sewing. To obtain the best results, use with natural fiber fabrics such as batiste and linen. Be careful when using this needle as the wings can damage finer fabrics and laces. Always make sure that the needle is in place before sewing. To test, simply turn the hand or flywheel towards you, if you feel or hear it hit the bobbin case the needle is not in the highest position. Readjust and test.
Q: Recently, I was sewing very heavy cording for some slipcovers I was making. I tried to use my zipper foot. However, the zipper foot that comes with my machine was not narrow enough to get close to the cording. Any suggestions?
A: The zipper foot that comes with many Janome sewing machines was designed specifically for sewing on zippers. For making your own cording or piping, try the Narrow Base Zipper Foot. Changing the needle position on the Memory Craft will allow you to adjust the needle closer to the cording using the narrow base zipper foot.
Q: My thread bunches up under the fabric when I start to sew. What causes this?
A: Your problem may be caused by any of the following:
- Before lowering the presser foot make sure the fabric is completely under the foot just in front of the needle.
- Place the needle and bobbin thread under the presser foot before beginning to sew.
- Make sure the bobbin is in the bobbin case or holder correctly.
- Make sure you have the correct bobbin for your machine.
- If you have a mechanical sewing machine with a front loading bobbin, make sure that the bobbin case is snapped into position.
- Check the threading of the machine. Is the thread through all of the thread guides, especially the take up lever?
- Be sure the bobbin thread has been brought up through the needle plate before starting to sew.
Q: What type of stabilizer do you recommend using for heirloom sewing?
A: For many years the only type of stabilizer that was used and recommended was spray starch. Now we have other options available. New products such as water- soluble stabilizer work for many applications. Another product to try is Stitch & Ditch Heirloom by ThreadPro. We suggest trying each to decide which is best for your project.
Q: I recently read an article in Threads magazine that talked about using decorative threads in the bobbin. I would like to know if this is possible on by machine, I own the Janome HD5000.
A: Yes, this type of work is possible on your machine and many others in the Janome product line
Q: I love heavy decorative cords for couching, but I can’t always find them in the colors I want. Is there an easy way to make my own?
A: You can create all sorts of wonderful cording trims with the Hemmer Foot 2mm D or Hemmer Foot 2mm D (front loading machines), included with nearly every Janome machine. Choose several thicker threads, such as: Pearl Crown Rayon, Designer 6, Candlelight or even yarn. Thread your machine with matching threads in the needle and bobbin. Place the threads in a bowl on the floor. Attach Foot D to the machine. Choose the zig-zag stitch (width 5, length 4). Twist the threads together and pull them through the twisted part of the foot. Pull the threads under the foot toward the back of the machine. You will not have any fabric under the presser foot. Lower the foot and stitch. You’ll be amazed at how quickly you can create a designer cord. Try different stitches, widths and lengths for unusual effects.
Q: When I appliqué using a satin stitch my fabric seems to stretch out of shape and won’t lay flat.
A: When preparing your fabric for appliqué, you need to stabilize it securely. For the best support, iron on a tear-away stabilizer to the wrong side of the fabric. Because it is ironed in place, it will not move while you are sewing, but it can still be easily removed when the project is complete. The fabric appliqué should also be secured with a fabric glue or iron-on fusible web, to hold it in place. Be sure to use the “F” foot provided with the Janome Machines. This is a transparent foot that will allow you to see your work as you sew. It has a deep insert in the center that will allow the satin stitches to glide under the foot. A custom-crafted “F” foot is also available that has the center bar completely removed for an increased view of your sewing area. When working with heavier fabric you can decrease the pressure on the entire foot with the adjustable Pressure Dial. This can give you more flexibility in manually guiding your fabric around curves. For basic appliqué, we suggest a zigzag stitch with a width of 3.5mm and a length of 0.35mm.
Q: When I am sewing several rows of decorative stitches, I program the automatic locking stitch to end each row. Sometimes this gives me too many stitches at the end and distorts my last pattern. How can I prevent this?
A: The automatic locking stitch will take 4 stitches to lock your pattern. On lightweight fabric you may not need all 4 stitches. In this case, simply press the stop button or take your foot off the pedal after sewing the desired number of stitches. Here’s a time saving trick to secure the beginning and end of each row of patterns. If you are doing several rows of the same pattern, let the machine take 2 stitches, then stop and move to next row to begin sewing. The additional 2 stitches will be saved to lock the beginning of your next row.
Q: I’m looking for different uses for the cross-stitch pattern (# 81) on the Janome memory Craft sewing machine. Do you have any suggestions?
A: You can size cross-stitch pattern # 81 from 100% to 40% with beautiful results. Start with the design you want then simply program in the number of cross-stitches in the pattern and sew. Repeat this process for each line of the pattern changing color where called for. You can use the cross-stitch for a hemstitch, which is popular on linens and heirloom clothes. The cross-stitch is also one of the many of the stitches on your machine you can use for fagotting — a decorative technique for joining fabric or lace. Remember to change the size for a variety of looks using the same stitch.
Q: What is lace beading?
A: Lace beading is a narrow, flat insertion lace, approximately 3/4″ wide. It has a row of holes running down the center, to be used most commonly for threading ribbon through them. However, it is still lovely when used without ribbon. You will see lace beading used extensively in heirloom sewing.
Q: What is entredeux?
A: Entredeux is a narrow strip of batiste with small holes running down the center. This is used in heirloom sewing, to join lace to fabric or lace to lace. The lace or fabric is sewn next to the holes, creating a lovely finish when the batiste is cut away on the underside and zigzagged with a very small zigzag stitch. The #6 stitch on the Memory Craft 9000 is wonderful for this application.
Q: What is the difference between topstitching and edgestitching?
A: Topstitching is usually done with topstitching thread (silk or polyester buttonhole twist) or two strands of regular sewing thread through the eye of the needle. The edge of the presser foot is often used as a guide to produce a ¼” row of stitches, and the stitch length is increased to 8 stitches/inch so that stitches show up better. Edgestitching is usually a utility finish, rather than a decorative one like topstitching. Although edgestitching can be used to match a row of topstitching, it’s more often used to prevent edges from rolling to the outside or to keep a tiny, folded edge from raveling. No special thread is necessary, nor are stitch length adjustments necessary. NOTE: On a Memory Craft machines, use the cloth guide for topstitching or edgestitching. Adjust the width to get the result you want.
Q: How do I do reverse bobbin work? Do I need a special bobbin case for it?
A: Reverse bobbin work involves sewing with thread or fiber too large to go through the needle’s eye. You can do bobbin work with decorative serger thread, narrow silk ribbon, or other fibers. You simply hand-wind your fiber on the bobbin, and lay it in the bobbin case without inserting it into the bobbin tension slot. Bring the fiber up through the needle hole with the needle thread. A decorative stitch will be sewn on the “other” side of the fabric. For best results you’ll want to enlarge the stitch to the widest and longest setting available. A zig-zag, or even a straight stitch can produce beautiful results. With Janome machines, no special bobbin case is necessary. Simply avoid the tension clip, bring the thread up through the needle hole, and you’re ready for this decorative technique.
Q: When sewing Twin Needle Pintucks, they don’t seem to “tunnel” down the center as much as I would like. How can I correct this?
A: Try using Janome Silk thread in the needles and Janome Topstitch thread in the bobbin. Increase the needle thread tension to between 6 and 9. The weight of the topstitching thread will create the “tunneling” that you are looking for.
Q: I’ve used a Wing Tip Needle for Heirloom Sewing. Is there anything else I could use it for?
A: Normally, you’d use a Wing Tip Needle for hemstitching on fine fabrics. However, folded pintucks or applique are both lovely when sewn with a Wing Tip needle. The #26 applique stitch on the Janome Memory Craft 9000 makes a beautiful “pin stitch.” Decorative stitches #31 through #40, and #81 through 89 on the Memory Craft 9000 are exquisite when sewn with a Wing Tip needle. Traditionally, sewing with a Wing Tip needle has been done on natural fibers such as cotton or linen. However, you can also experiment with different types of fabric. The “hole” created by the needle may not be as pronounced, but a lovely effect can still be achieved. Denim and chambray are perfect and practical places to use the Wing Tip needle. Stitch #122 on the Memory Craft 9000 can be used to accent collars, cuffs and plackets. Here are some stitches to try with the Wing Tip needle on other Memory Craft Machines:
MC 8000 — #24, #25, #28, #54, #57, #59, #101
MC 5000 — #15, #16, #17, #18
MC 4000 — #31, #32, #35, #58, #60, #61, #63, #66, #90
MC 3000 — #14, #15, #16, #25, #26, #28, #29
Q: When I try to sew a blind hem, I always see too much thread on the front of my garment. How can I make smaller stitches?
A: Both length and width can be adjusted for the blindhem stitch on the Janome Memory Craft machine. These adjustments are seen on the visual touch screen, and can be precisely adjusted numerically. For lightweight fabric, adjust the width to 0.4. This will allow a smaller “bite” with the left-hand swing of the needle. For heavier fabrics, you can increase the width to allow for the added bulk at the fold. Increasing the length will make the stitches farther apart, so you will see fewer stitches on the front of your fabric. Always test on a scrap of fabric to find the optimum settings for each fabric type. And, remember to choose a thread color as close to the fabric as possible. Invisible thread is an option for difficult to match fabric or prints.
Q: My buttonholes always turn out even, except when working close to the neckline. How can I make my top buttonhole look as good as the rest?
A: Neckline buttonholes require more preparation because of the many different layers of fabric used for the collar, collar stand, and facings. This is the spot they all come together. It is important that you “grade” your inner seams before turning the right sides out. In some cases, there is more to consider. If the facings on one side are considerably higher than the other, you should even out the fabric before it is placed under the buttonhole foot. To do so, use several layers of tearaway stabilizer to “prop up” the lower side. This will allow the fabric to feed evenly under the buttonhole foot and will not fall into the stitching area. Think of it like walking with a tennis shoe on one foot and a heeled pump on the other. You need to create a balance for the fabric to move smoothly. Finally, place a single layer of lightweight tearaway stabilizer under the entire area before sewing.
Q: I like to topstitch pockets very close to the edge but it’s hard to stitch straight. Is there any way to make my pockets look like ready-to-wear?
A: The Blind Hem Foot G, which is included with all the Memory Craft machines, is an excellent choice for this job. Attach the foot, select a straight stitch. Touch the WIDTH KEY. Touch the MINUS KEY. This will allow you to select different needle positions. Start by setting the width to 1.0. Line the back edge of the pocket with the black guide on the foot. The stitching will be about 1/16″ from the edge.
Q: When I use my Memory Craft’s Professional-Style Embroidery feature on bulky fabrics, such as sweatshirts, or fleece type fabrics, my embroidery stretches the fabric and becomes buried in the nap. Help!
A: Fabrics with a high nap require a stabilizer that will hold the fabric securely. An iron-on, tear-away stabilizer works well on the wrong side of the fabric. However, you should also use a water soluble stabilizer on top of your fabric to keep the thread from becoming buried in the nap. Very spongy fabric such as fleece may require the use of Super Solvy Stabilizer by Sulky. If the fabric is extremely dense two layers of Super Solvy are suggested.
Q: With so many different types of stabilizers to choose from, are there any rules for which one is best for different types of fabrics and techniques?
A: Just like sewing with a good quality thread and needle, to achieve professional sewing results when using Memory Cards it is important to stabilize the fabric. When the designs are sewn without the proper stabilizer, unsatisfactory results may sometimes occur. In some cases the thread can be “heavier” than the fabric, causing distortion in the design. There are many different types of stabilizers available and most of them are excellent. Three of the most popular types of stabilizers are tear-away, iron-on and water-soluble. To determine the correct type and the number of layers of stabilizer your project requires, it is recommended to test sew the embroidery before beginning your project. The water-soluble stabilizer may be placed on the right and/or wrong side of the fabric. It eliminates bulk and “whiskers” that are left by tear-away stabilizers. It is used where both sides of the project will be seen when sewing is completed, such as terry cloth. It can also be used on the top of the fabric where the threads may “sink” into the cloth, such as fabrics with nap (velvets and corduroy). Remember that this stabilizer is removed with water so do not place on fabric on which water can not be used. Iron-on and tear-away stabilizers are the most popular. Even combining the two will give great results. These types of stabilizers are only used on the wrong side of the fabric. After the stitching is completed, the excess stabilizer is removed, but the stabilizer under the threads remains. It will not be removable even after several washings. Sometimes, several layers of stabilizer may be required to achieve professional results. Note: If the project requires a heavyweight tear-away stabilizer, try using several layers of lightweight stabilizer instead. It is much kinder on the threads when removing the excess. Lightweight fabrics presents the problem of the thread being heavier than the fabric. You must add volume to the fabric with stabilizer to support the weight of the thread. Try using one layer of iron-on and 2 to 4 layers of tear-away. If the fabric is not only lightweight but also sheer, you may need to try several layers of water-soluble stabilizer on top of the fabric and a tear-away underneath. Depending on the design selected to be sewn, spraying the fabric with spray starch or spray sizing can be enough for beautiful results. For medium weight fabrics, try one layer of iron-on and 1 to 2 layers of tear-way stabilizer. For heavy weight or very dense fabric, one layer of either iron-on or tear-away is probably all you will need. When your project has stretch, it may be necessary not only to stabilize but also to interface the stitching area. A good interfacing to have on hand is lightweight fusible knit. Place the stretch of the interfacing going in the opposite direction to the stretch of the fabric and then stabilize. There are also two fairly new stabilizers on the market that are paper-backed release adhesive sheets. One is a tear-away and the other is water-soluble. The inner hoop of the embroidery hoop is not required. The stabilizer is “stuck” to the outer hoop and the fabric “sticks” to the stabilizer. This is perfect for collars, cuffs and other small projects where it is difficult to get the project in the hoop. This type of stabilizer is also great for fabrics that may be harmed by “hooping.” Give one of these suggestions a try for better looking Professional-Style Embroidery.
Q: Why are there so many embroidery hoops? How do I know which one to use or how many to buy?
A:
- The optional embroidery hoops available for the Janome sewing machines are designed to make certain applications easier. Hoop No. 1:
- Supplied with the sewing machine can be used for any application. Hoop No. 2:
- This hoop can only be used with smaller designs and is particularly useful when embroidering on children’s garments or in a confined area. Hoop No. 3:
- This large, round embroidery hoop can be used for any application. It is particularly useful when quilting, embroidering on towels or very thick fabric. Hoop No. 5: This is a very large, almost square, embroidery hoop that has a slide facility enabling you to stitch a design and then move the hoop to stitch another design underneath. It is useful when you are wanting to combine designs in an area without having to move the fabric and also when lettering, enabling more rows to be sewn one under another.
Q: I try using the Clothsetter and templates, but my designs are still “off” when I sew. Can you help?
A: The Clothsetter provides the sewist with a very precise and easy way to place embroidery designs in a desired location on the fabric. Your problem may be that you’ve forgotten to calibrate your Clothsetter to your Memory Craft. It is vital to calibrate the Clothsetter to the actual machine with which it is to be used. This is a simple process which takes only a minute. Set up your Memory Craft for Professional Style Embroidery. Insert Memory Card #102 and select pattern 48 (test pattern). Insert a piece of stabilized woven fabric in Embroidery Hoop #1. Attach the hoop to the carriage and sew the “test pattern.” When completed, remove the hoop from the carriage, but do not remove the fabric from the hoop. Attach the hoop to the Clothsetter. Bring the Clothsetter positioning arm down on the fabric. Match the red lines on the arm with the sewn test pattern. If the marks do not match up perfectly, loosen the two screws on the silver plate. Move the hoop until all lines match. Using a long-handled screwdriver, alternately tighten screws. Your Clothsetter is now calibrated for your Memory Craft Machine.
Q: What is the heaviest thread I can use on my Memory Craft for Professional-Style Embroidery?
A: We usually use 50-weight thread for most applications. However, heavy fabrics (denim, bath towels, sweaters, etc.) may need 30-weight thread/80 needle to fill the design properly. Metallic threads are available in 30, 40 and 60 weight and all can be used on the Memory Craft machines. Luny thread is also available for embroidery. This thread is lightweight yarn and is great for animals, flowers etc. and resembles crewelwork when stitched out.
Q: I have drawn a line on my fabric for the placement of decorative stitches. But it’s hard for me to see the arrow located on the front of the F foot against my white fabric. Any suggestions?
A: The F Foot is perfect for sewing decorative stitches. Try filling in the arrow with a permanent marker. The filled-in arrow is easy to see on both dark and light fabric. Results are perfectly straight lines of decorative stitches.
Q: Can I embroider multiple patterns in the same hoop area?
A: Yes. If your fabric does not need to be rehooped after stitching the first design, raise the presser foot and place the template of the next design in the desired location. Hold the template in place and touch the edit key to move the needle to the starting point of the template’s pattern. Remove the template, lower the presser foot and embroider the pattern.
Q: How can I make my own Memory Card templates on transparencies?
A: There are two methods for making transparencies. Method 1: Embroider one design from the Memory Card from which you wish to make templates. Take the pictured inner liner that came with the Memory Card to a copy machine and increase the size to approximately 270% (this will vary with each card). Print the design you embroidered and check to see if it is the exact size, and increase or decrease the size on the copy machine until the printed design is the exact size of your embroidered one. Once the size is the same you can simply copy the inner liner on transparencies to make your own templates. Method 2: Embroider your design on a piece of stabilized test fabric. With the embroidered design still in the hoop, stitch the placement patter on top of the design. The placement pattern is number 48 on Memory Card 102 and is the last design on all three-digit memory cards. Place a transparency over the embroidered design and placement pattern. Trace the lines of the design, the circle and cross. Draw an arrow at the top of the design, which will indicate the direction for placing your project in the hoop. Write the number of the design and the memory card number on the transparency. This will help you organize your templates; as well as recognize the front of the transparency.
Q: When I do professional style embroidery, the fabric often puckers, or the outline of the design doesn’t meet the design precisely. I am using a tear away stabilizer underneath the hoop. What can I do to correct this problem?
A: This is a very common situation. Even though you are using a stabilizer, it is not adequately stabilized. Try an iron-on tear-away stabilizer such as Firm Hold™ or Totally Stable™, ironed on the back and put into the hoop. Occasionally another layer or two of stabilizer is also placed under the hoop. (Tear these off one layer at a time.) With a stretchy knit shirt or terry cloth, we sometimes also add a water Soluble layer of Solvy™ or Dissolve™ on top! When you are embroidering a design with very dense stitches-the fabric shrinks, hence you get Puckers, or the outline stitches don’t line up. We prefer the hoop #1, because you can open it wide, and tighten with a screwdriver — We use it in Combination embroidery designs because we can get it very tight.
Q: Is it absolutely necessary to use only Janome bobbin thread in the bobbin for memory card embroidery, or can I use any standard sewing thread?
A: You should not use standard sewing thread in the bobbin, as it may not be the correct weight for machine embroidery. Superior stitch quality is achieved with Janome bobbin thread. The weight of the Janome embroidery thread [which is 60/2], was designed specifically for embroidery. This thin, smooth, strong thread is the correct weight to use in the bobbin, with Janome Embroidery thread in the needle, for a balanced stitch and professional looking machine embroidery. The incorrect weight bobbin thread can cause the bobbin thread to show on top of your embroidery.
Q: I’ve followed the directions for calibrating my Clothsetter, and have used it many times with perfect placement. But lately my placement has been inaccurate. Why has it changed?
A: The Clothsetter is calibrated by adjusting the two set screws under the placement arm. As you continue to use the Clothsetter it is possible for those screws to loosen and shift even though you have secured them properly. This occurs gradually with normal handling and is not a defect. Therefore it is advisable to regularly recalibrate the Clothsetter, especially before you are doing critical placement, such as joining designs to create a larger image. TIP: Using a long handled screw driver provides better leverage for accurate adjustment.
Q: I am sewing a sentence that goes beyond the sewing field of the embroidery hoop. How can I sew out more letters?
A: The following procedure is used for the Normal Embroidery Mode or the Edit Design Mode (ABC+). 1. When sewing letters you must first draw a horizontal line on the fabric where you want the letters to be sewn. Place the fabric in the hoop with the line on the fabric lined up with the crosshair on the Clothsetter. 2. Place the hoop on the carriage and press the Positioning Arrows or Edit Key (depending on which embroidery mode you are in) and move the rectangle so the needle is placed over the line on your fabric. 3. You will now embroider as many letters as possible. Once the machine stops, clip the thread leaving about 2 inches — do NOT clip down to the fabric. 4. Remove the fabric from the hoop, and using the Clothsetter, re-position the fabric moving it to the left of the hoop and position with the crosshair over the line drawn on the fabric. 5. Attach the hoop to the carriage and press the Positioning Arrows or Edit Key and press the arrows to move the needle over the thread you cut (the 2 inches). You will want the needle to go down in the fabric where the clipped thread is coming up. You are now ready to sew.
Q: Both my friend and I own Memory Craft 9000s. I use the Clothsetter and get perfect placement. My friend borrowed my Clothsetter but she did not get the same satisfactory results. Why would we have different results with the same Clothsetter?
A: Both the Clothsetter II and III are compatible with the Memory Craft machines. However each machine is unique. You can use the same Clothsetter for several machines, but you will need to recalibrate the Clothsetter for each machine used. You will need to stitch the test pattern from the machine currently being used to recalibrate the Clothsetter for satisfactory results. Because of the slight variations from one machine to another it is more advisable to purchase separate Clothsetters.
Q: I am sewing a sentence that goes beyond the sewing field of the embroidery hoop. How can I continue to sew more letters and keep them in a straight line?
A: The following procedure can be used for the Normal Embroidery Mode or the Edit Design Mode (ABC+).
- When sewing letters you must first draw a horizontal line on the fabric where you want the letters to be sewn. Place the fabric in the hoop with the line on the fabric lined up with the crosshair on the Clothsetter.
- Place hoop on the carriage and press the Space Check Key or Edit Positioning Key (depending on which Embroidery Mode you are in) and move the rectangle so the needle is placed over the line on your fabric.
- Embroider has many letters as possible. Once the machine stops, clip the thread leaving about a 2″ tail. Do NOT clip the thread down to the fabric.
- Remove the fabric from the hoop. Using the Clothsetter, re-position the fabric, moving it to the left of the hoop and position with the crosshair over the line drawn on the fabric.
- Attach the hoop to the carriage and press the Space Check Key or Edit Positioning Key and press the arrows to move the needle over the 2″ thread tail. You will want the needle to go down in the fabric where the clipped thread is coming up. You are now ready to continue sewing.
Q: How to choose the right needle for sewing machine?
A: You probably already know the basic rule regarding sewing needles: a replacement for a new one after each large sewing project. Even a slightly blunt tip or a damaged needle eye can seriously affect the result of sewing. After all, on modern sewing machines, the needle pierces your fabric at speeds of 600 to 1,200 stitches per minute. However, it is also important to choose the right type of needle.
If you look at the proposed needles in the most ordinary sewing shop, you can see at least a dozen different varieties. In appearance, they all look alike, unless you look at them with a magnifying glass. But different types of needles have different needle eyelets, different points, different rods, etc. All these parameters are of great importance for work.
Let’s take a look at the main types of needles in accordance with the attached illustration:
Q: I recently wound a bobbin on my sewing machine with monofilament thread and it did not work the way I expected. I could not get the bobbin off the bobbin winder. What happened?
A: It sounds like the bobbin was wound at a high speed. When winding bobbins of monofilament thread, use a slow to medium speed. This prevents the thread from stretching and becoming tight on the bobbin. Also, if you are using a plastic bobbin, wind the bobbin only half way this will prevent the bobbin from warping.
Q: I’m using an iron-on tear away stabilizer when I embroider on lightweight sweatshirts, but they still seem to stretch when stitched. Any suggestions?
A: An iron-on stabilizer is recommended when embroidering on sweatshirts, however they come in several weights. It is best to use the heavier weight iron-on, and in addition use a layer of water-soluble stabilizer on top of your sweatshirt, within the hoop. The use of an iron-on interfacing, ironed on with the grain in the opposite direction of the shirt is also very helpful when embroidering on knits. When using an iron-on stabilizer the fabric can not shift or stretch, making it easier to embroider on and with the use of an iron-on interfacing you will have no stretch or puckers when you embroider.
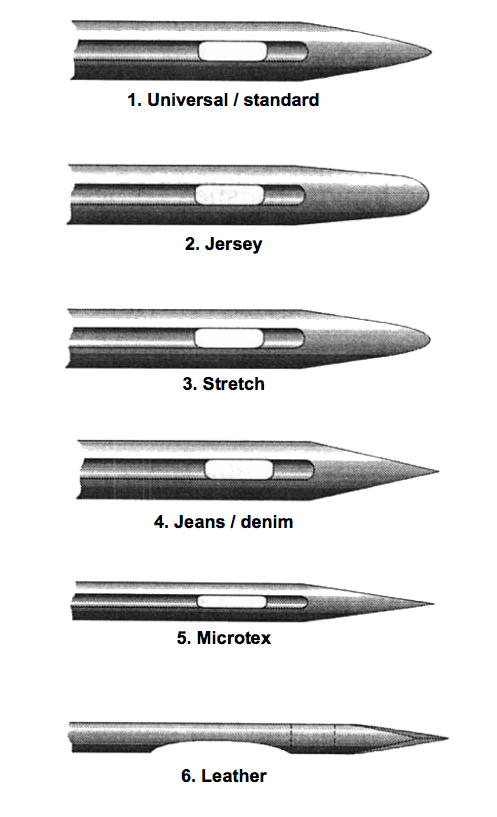
1. Universal / Standard
Features: slightly rounded tip, go in the standard for the sewing machine.
Materials: silk, artificial silk, cambric, chiffon, organza, linen cloth, georgette, poplin, ribbed plis.
2. Jersey
Features: medium-rounded tip.
Materials: thin knitted and crocheted products, single (unilateral) jersey, corsetry fabric, knitwear.
3. Stretch
Features: medium-rounded tip.
Materials: high-elastic knitwear, simplex, latex, lycra.
4. Jeans / Denim
Features: sharp tip.
Materials: denim, canvas, twill, artificial leather.
5. Microtex
Features: thin rod and very sharp tip.
Materials: Microfibrous, thin and dense-web material, for example for silk, taffeta, etc.
6. Leather
Features: The point has the shape of a blade and cuts through the material.
Materials: suede, pork skin, calfskin, goatskin leather.
Q: Can I use a hoop other than the Memory Craft Embroidery Frame when embroidering?
A: Absolutely. You can use a regular embroidery hoop for “free motion” embroidery when the feed dogs are lowered. When you use a manual embroidery hoop, we would suggest one with a screw you must tighten with a screwdriver. This will make your hooped fabric very taut, which is necessary in free motion embroidery. You can use either a straight or a zigzag stitch to embroider over a drawn design.
Q: When I used Memory Card #117 the border sewed over my letters. What am I doing wrong?
A: Sorry you had a problem. When embroidering with Memory Card #117 in the Memory Craft 5000 or 5700, use the following instructions for programming and sewing:
- Program in the first letter and memorize by pressing M on the Touch Pad. Notice that there are three symbols under each group of the three letters and that the first symbol is highlighted. NOTE: Located in the upper right corner of the Visual Touch Screen are three symbols — the first is a hoop with numbers beside it representing the Embroidery Hoops suggested. Next is pO1 which represents the page number of the screen that you are on (there are 14 different screens) and last is a spool of thread with an arrow on it which tells you, when highlighted by pressing, that the machine will stop after sewing each letter so that you can change the thread color.
- Page forward to page 4. The alphabet will start over again and the middle symbol under the letters is highlighted. Program in the middle letter and memorize.
- Page forward to page 6. The last symbol is highlighted. Program in the last letter.
- Sew the letters. When sewing has been completed, delete the memorized letters by pressing the C (clear) Key on the Touch Pad.
- If you wish to sew a border around the letters, select from one of the four borders available by going back to page 2 or 3. Select the border of choice and memorize.NOTE: When the border is pressed once a 3 appears under the border design. When the same border design is pressed again a 2 appears under the pattern. Be sure to select the 3 if you have stitched a 3-letter monogram or a 2 for a 2-letter monogram. The same method for sewing is used for letters that are diamond shaped for escutcheon
Q: I have the Janome 5 Thread Spool Stand (832420003) and I’ve lost the little thread guide. Can I replace just the small thread guide ?
A: Yes it’s available through your local Janome New, part number (832420302).
Q: When I need to adjust my embroidery hoop to continue embroidering a word, my hoop shifts slightly. No matter how hard I try, the hoop slides a little and my words are always uneven. How can I prevent my hoop from shifting and achieve straight embroidery?
A: If you’re using the rectangle hoop, make sure the fabric is taut before you begin to sew. If needed, you can use a small screwdriver to tighten the screw. If you’re having a difficult time keeping the line straight as you place the fabric in the hoop, try a round embroidery hoop. It’s spring loaded and sometimes easier for positioning. Once the fabric is in the hoop and placed on the Janome embroidery Machine, if the position is not exactly where you want it to be, use the Edit Embroidery Key and move the hoop to your desired position. Older Memory Craft Owners: Press the Space Check Key, then move the hoop so that the needle lines up with the previous row.
Q: How do I make a comma with Memory Card #101?
A: The following procedure is used to make a comma with Memory Card #101
- Select the letters you wish to sew and select a small space where you need the comma.
- Press the Edit key and clear the screen of all previous embroidery patterns.
- Press OK. Sew and complete your lettering.
- Clear all the letters.
- Select the number of spacers you will need to move over to the small space.
- Page over to the European mode and select the apostrophe.
- Press the Edit key and press the directional arrows to lower the rectangle on the edit screen, moving the apostrophe down to where it becomes a comma.
- Press OK and sew. (832420302).
Q: I’ve seen the Janome Thread Stand at my dealer’s store. When would I use this accessory?
A: The Janome Thread Stand gives you a simple way to organize your various thread colors in the order you’ll need them for embroidering designs. And the stand makes it easy to repeat designs without color confusion. Also, many threads benefit from a vertical delivery system because of the way they are designed to unwind from the spool. The extra guide on the top of the stand, and the one mounted in the auxiliary spool pin holder, provide supplemental guidance for unruly threads.
Q: I want to topstitch with a heavier thread, but I can’t find a selection of color choices to match my fabric.
A: Two threads can be used through the needle to create a bolder effect when topstitching. Janome Embroidery Thread is available in wide selection of colors, and will work very well for this technique. You’ll need to replace your regular needle with a topstitching needle. This needle has a bigger eye to accommodate the two threads. Place both spools of thread on the separate auxiliary spool pins that are included with the Memory Craft machine. Your thread will “reel” off the spools at the same rate, eliminating thread breakage. The accessory spool stand for the Memory Craft 9000 is also a perfect tool for this technique.
Q: When I try to sew a blind hem, I always see too much thread on the front of my garment. How can I make smaller stitches?
A: Both length and width can be adjusted for the blindhem stitch on the Memory Craft 9000. These adjustments are seen on the visual touch screen, and can be precisely adjusted numerically. For lightweight fabric, adjust the width to 0.4. This will allow a smaller “bite” with the left-hand swing of the needle. For heavier fabrics, you can increase the width to allow for the added bulk at the fold. Increasing the length will make the stitches farther apart, so you will see fewer stitches on the front of your fabric. Always test on a scrap of fabric to find the optimum settings for each fabric type. And, remember to choose a thread color as close to the fabric as possible. Invisible thread is an option for difficult to match fabric or prints.
Q: I like to finish my hems with a double needle straight stitch, but on fabrics with any stretch, the hems “bubble” out of shape. How can I prevent this?
A: Hems that have a tendency to stretch can be stabilized in several ways. Since each fabric has its own characteristics, it is best to do a test before using any stabilizer on your actual garment. Try one these methods. #1) For sewing machines — Wind your bobbin with woolly nylon and use the “F” foot included with Janome machines. The woolly nylon thread is stretchable and very strong; it will help eliminate puckers. The “F” foot will provide a tunnel for the double needle stitch to feed through. You may also get better results by decreasing the pressure on the foot with the Pressure Release Dial. #2) For sergers — Use the 4 thread serger stitch to serge the raw edges of the hem, then turn up the hem and press with an iron. For many fabrics, this is enough to prevent stretching. If the hem is an “A” line, you will need to set the differential feed to a setting of 1.5 or more to ease in the excess fabric. For very stretchy fabric, iron on a 1/2″ strip of a lightweight lining, such as knit fuse, before serging.
Q: I like to sew around my buttonholes twice, but often the thread bunches in the middle of the second buttonhole.
A: The pre-set buttonhole length of .45 on the Memory Craft machine is designed to give enough density to the satin stitch that, for most fabrics, stitching just one time around is enough. If you choose to sew around the buttonhole twice, it is recommended you increase the length to at least 0.5 to allow space for the second round of stitching. Keep in mind that buttonholes which will be used repeatedly, such as ones on a blouse or waistband, need to have some flexibility in order to slide over the button. They need a stitch length that will allow for “ease.” If a buttonhole is used for embellishment, and it will not be used very often, a heavier satin stitch would work. You should always do a test buttonhole on your fabric, including any lining and interfacing.
Q: I have been told that I can sew on buttons with my sewing machine. How do I set up my machine for this technique?
A: Janome provides a foot just for sewing on buttons. It is included with the Memory Craft 9000 and is available as a accessory for Janome’s other models. This foot will “hold” the button in place while sewing. The button can also be secured to your garment with transparent tape. First, manually drop your feed dogs. Stitch # 17 on the Memory Craft 9000 will automatically set a 3.5 zigzag width and no length, because your feed dogs are disengaged. This stitch will give you 10 zigzag stitches then a locking stitch. (On other Janome models, you can set your zigzag width manually.) With the Memory Craft 9000, Janome also provides a wedge to place at the back of the presser foot which allows a shank to form on the back of the button. You will need to test your button to be sure that the 3.5 width is accurate. Although this is a standard size, the width can be adjusted wider or narrower. Once you see how simple this is, you’ll never sew buttons on by hand again.
Q: My buttonholes always turn out even except when working close to the neckline. How can I make that top buttonhole look as good as the rest?
A: Neckline buttonholes require more preparation because of the many different layers of fabric used for the collar, collar stand and facings. This is the spot they all come together. It is important that you “grade” your inner seams before turning right sides out. But in many cases this won’t solve the whole problem. If the facings on one side are considerably higher, you need to even out the fabric before it is placed under the buttonhole foot. Use several layers of tear away stabilizer to “prop up” the lower side. This will allow the fabric to feed evenly under the buttonhole foot. This stabilizer will be on the far end of the buttonhole foot and not fall into the stitching area. Think of it like walking with a tennis shoe on one foot and a heeled pump on the other. You need to create a balance for the fabric to move smoothly. Finally, place a single layer of lightweight tear-away stabilizer under the entire area before sewing.
Q: How much storage is there in the Memory Craft 9900 sewing machine?
A: There is 3MB of storage in the MC9900 sewing machine.
Q: Im not familiar with some of the lace terms used in sewing magazine. What is Alencon Lace, Venice or Venetian Lace, and Lace Beading?
A: Alencon Lace is a heavily embroidered lace with a floral design on a net background. The floral outline is made in a heavy, corded thread. Venice or Venetian Lace is a trimming, woven with floral designs usually connected with a picot style or pointed edge. It looks like a finely crocheted lace. Lace Beading is a trimming with two straight edges, usually placed between two other materials. It has holes running along the center for weaving through a narrow ribbon.
Q: When I understitch my facings with a straight stitch, I often get a ridge around the inside edge that does not lay flat. Should I change the length of my stitch?
A: Under stitching helps keep the facing on the inside of your garment and provides a clean edge on the outside. Depending on the weight of the fabric, a lining fabric could be used for your facing instead of your fashion fabric. It is also very important to grade your seams before turning the facings. Instead of the straight stitch, try using the multiple zigzag stitch #9 on the Memory Craft 9000. Adjust the width to 3.0. This will allow for the stretch in curved areas. Also, the width of the zigzag will even-out the fabric as you sew, eliminating the ridge you can sometimes get when the straight stitch becomes buried in the fabric layers.
Q: Sometimes thread will “ball up” in the bobbin area of my sewing machine. Normally, my Janome machine has such consistent tension. Can I do something to prevent this?
A: When thread snarls on the underside of your fabric, it’s almost always the upper thread tension that needs attention. There are three very common reasons why the upper thread suddenly seems to go “haywire.” First, if a sewing machine is threaded too quickly, it’s possible to miss threading the take-up lever. The take-up lever is the silver hook that is threaded just before you bring the thread down to the needle. When the thread is not in the take-up lever, it’s like there’s no tension at all. Thoughtfully, Janome has added a “stopper” to prevent the thread from popping out of the take-up lever. Taking a little extra care to get the upper thread past the stopper and all the way into the take-up lever will insure good stitch quality. When changing thread colors for Professional-Style Embroidery, Memory Craft 9000, 8000, and 5700 owners need to remember to lift the foot between colors. The “P” foot might look like it’s up when the needle is in the highest position, however, if the foot is not lifted, the upper thread will not drop into the tension. When you begin embroidering, the thread will loop on the underside. Allowing the thread to continue to build up in the bobbin area can cause an “overload” situation. Last, but not least; thread quality can dramatically affect your stitching. Poor quality thread will break more easily, create more lint in your machine, and can cause inconsistent tension. The little bit extra you pay for top quality thread will save you hours of frustration. By keeping these three simple tips in mind you will enjoy that wonderfully consistent Janome thread tension.
Q: What is the best way to unthread my sewing machine?
A: Always cut the thread at the spool and pull the thread through the needle and out of the machine. If you remove the thread by pulling on the spool, unthreading the machine in the reverse of normal thread flow direction, the thread can easily get caught in your tension mechanisms as you pull. By unthreading in reverse direction thread can also cause the needle to bend at the tip, resulting in a bent needle damaging the needle plate and hook assembly.
Q: How many other languages are available on the Memory Craft 9900?
A: There are 13 different language choices.
Q: How important are the spool caps, and how do I determine which size to use?
A: Spool cap covers prevent thread from catching in the spool notch, and assure even delivery of thread. Ordinary spools require the large spool cap, which is larger in diameter than the thread spool, and thinner spools use the small cap cover, which is larger in diameter than the spool, and yet not too large as to impede thread delivery. When using metallic threads, it may be more desirable to stand the spool on the auxiliary spool pin or on an accessory thread stand, with the large spool cap underneath the spool, with the flat side to spool end.
Q: Can you give me some guidance in choosing the correct type of interfacing? I’m not sure what kind I should use for various projects and fabrics.
A: Choosing the correct interfacing for the fashion fabric you are using will help you provide shape, body and support. You will want to compare and try several weights in order to select the kind that will give you the drapability and durability you need. Interfacing Tips: · Hold the two layers (the fashion fabric and the interfacing) together to test for compatible draping, weight, color, and fabric care. · Fusible interfacings have made the process very easy and are a good choice whenever possible. Fusibles often change after fusing, so it’s important to test for appearance, drape, and care. · Woven fusibles generally work best with flat fabrics, and non-wovens work best on textured fabrics. · When ironing interfacing, it’s important to lift the iron to move it, instead of sliding. Also, follow the manufacturer’s directions, including the amount of time needed to fuse. · TEST TEST TEST !!! No matter which interfacing you use, your garment will look better with it than without it.
Q: I would like to have tighter gathers when I use the Gathering foot. How can I do this?
A: Set up your machine for gathering by increasing the stitch length to 5.0 and placing the needle thread tension to between 6 and 9. Attach the Gathering Foot. Place the fabric under the foot. Using the fingers on your left hand, hold the fabric against the rear of the foot as you sew. By holding the fabric against the foot with light pressure as it comes through the feed dogs, lovely tight gathers will result. Release the fabric every 4 to 5 inches and then apply the pressure again.
Q: My thread bunches up under the fabric when I start to sew. What causes this?
A: Your problem may be caused by any of the following:
- Before lowering the presser foot make sure the fabric is completely under the foot just in front of the needle.
- Place the needle and bobbin thread under the presser foot before beginning to sew.
- Make sure the bobbin is in the bobbin case or holder correctly.
- Make sure you have the correct bobbin for your machine.
- If you have a mechanical machine with a front loading bobbin, make sure that the bobbin case is snapped into position.
- Check the threading of the machine. Is the thread through all of the thread guides, especially the take up lever?
- Be sure the bobbin thread has been brought up through the needle plate before starting to sew.
Q: Recently, I was sewing very heavy cording for some slipcovers I was making. I tried to use my zipper foot. However, the zipper foot that comes with my machine was not narrow enough to get close to the cording. Any suggestions?
A: The zipper foot that comes with many Janome sewing machines was designed specifically for sewing on zippers. For making your own cording or piping, try the Narrow Base Zipper Foot. Changing the needle position on the Memory Craft will allow you to adjust the needle closer to the cording using the narrow base zipper foot.
Q: When I sew Professional-Style Embroidery, the outlines of my embroidery design don’t line up next to the body of the design. Is there something wrong with my Memory Card?
A: Your Memory Card is fine. When the outline stitching does not match the body of your design, check two things: your hooping and your stabilizer. Your fabric must be taut in the hoop for correct stitching. Make sure that the screw that holds the inner part of the hoop is tightened sufficiently. A very common oversight made by sewists is not using enough stabilizer. The stabilizer supports the fabric, allowing the thread to form the design. Without enough stabilizer, the threads can distort the fabric. When embroidering a densely stitched design, the fabric may require more than one layer of stabilizer. Fuse a layer of iron-on tearaway to the wrong side of the fabric and place in hoop. Then, before beginning to sew, place tearaway stabilizer between the hoop and the feed dog. Some fabrics may require several layers of stabilizer. To increase the coverage of the outline, place two threads of your outline color in the needle. Another option for Memory Cards, starting with #101, is to stitch your outline twice. After inserting your Memory Card, select the outline as the first color to sew. Sew the outline. Then, start the design over again, and sew all the colors in their standard order. You will then end up with two layers of outline stitching.
Q: Can the MC9900 embroidery machine be connected to your computer to transfer designs?
A: No, the MC9900 uses USB flash drives to transfer embroidery files from the computer to the machine.
Q: What is the largest USB flash drive the Memory Craft 9900 can read?
A: Ideally, you want to use a 2GB USB flash drive with the MC9900.
Q: Are there lessons available for learning the Embroidery software for my Memory Craft?
A: Yes, Janome offers free lessons for our software. See the complete list on our Software Lessons page.
Q: I’ve saved designs on the USB flash drive but the Memory Craft 9900 does not read them, what am I doing wrong?
A: The .JEF designs must be in the embf folder on the USB flash drive for the Memory Craft 9900 to recognize them.
Q: When I browse my USB flash drive in My Computer, what is the ORD file for? Can I store designs in the ORD folder?
A: The ORD folder is for storing stitch combination, not Embroidery designs. If you stored a .Jef design in the ORD folder the sewing machine would not know what to do with it and will prompt an error message.
Q: What Janome software is compatible with my Memory Craft 9900?
A: Digitizer Jr Ver.5 & Digitizer MBX Ver.5 are both compatible with the MC9900
Q: Does the Janome Memory Craft Embroidery machine have to be turned off to insert media?
A:No, the Memory Craft can be on or off when you insert the media. However, the Memory Craft should not be turned on or off while it is writing data to the media. Powering on/off the Memory Craft while it is writing data to the USB flash drive will damage the stick.
Q: How do I access an embroidery design from my USB flash drive in the Memory Craft 9900?
A: Place the USB flash drive into the Memory Craft 9900. Touch the icon with the file folder with the arrow coming out of the folder. Next, touch the icon of the USB flash drive & open the embf file. The designs will be found in that folder.
Q: What additional hoops are available to use with my Memory Craft 9900?
A: The fa10a (3.9” x 1.6”) is only one optional embroidery hoop available for the MC9900.
Q: My screen is misaligned, how do I fix it?
A: To align your screen, please touch the SET icon & go to the 2nd page in the common settings. Next, touch “YES” under Touch Screen Calibration and follow the directions on screen.
Q: What is the Standby timer?
A: The Standby timer is an energy saving mode that will turn the display screen dark and turn off the light. Simply touch the display screen to resume sewing.
Q: How do I make the sewing machine display screen stay on longer and not dim out?
A: You can lengthen the Standby timer by increasing the time. Touch the SET icon and press the + icon to increase the time the Memory Craft 9900 display screen will stay on or touch the – to decrease the time the display screen stays on.
Q: In the Set Mode, what does Format Built-in Memory mean?
A: By selecting Format Built-in Memory in the Set Mode, the machine will erase and reformat the sewing machines built in memory.
Q: In the Set Mode, what does Format USB mean?
A: By selecting Format USB in the Set Mode, the machine will erase and reformat the memory on a USB flash drive while placed in the Memory Craft 9900.
Q: In the Set Mode, what does Reset all to defaults do?
A: When you press the YES key all settings will be restore to their original setting, except for the language.
Q: Where is the serial number for my Janome sewing machine?
A: The sewing machine serial number is located on the back of the Janome machine on the silver tag. This tag also displays the model, voltage and how much electricity is required, where it was manufactured and if it is UL listed.
Q: What does the Trace Outline do?
A: The Trace Outline moves the needle in square outline over the perimeter of the design.
Q: When working with knits and other stretch fabrics, I’m not sure what type of stitch is best for construction. I have had trouble with seams stretching out of shape and facings that do not keep their shape.
A:The stretchable qualities of many fabrics make them easy to wear but do require some very specific construction techniques. The Overlock 4 serge stitch on the Pro 4DX is perfect for seams on knits and other stretchables. The 4 thread stitch is preferable to a 3 thread stitch because the 4th thread provides a stable straight stitch by using both needles and an overcast stitch wide enough to give a neat, tailored edge to the inside of your garment. When attaching facings, the Overlock 3 serge stitch will give you a more flexible seam needed for the curves of the neckline and armholes.
Q: What design format can the Memory Craft 9900 Embroidery machine read?
A: The MC 9900 can read .JEF or .JEF+ embroidery files.
Q: In the Set Mode, what does Format USB flash drive mean?
A: By selecting Format USB flash drive in the Set Mode, the machine will erase and reformat the memory on a USB flash drive while placed in the Memory Craft 450E.
Q: How can I control decorative threads, which wind off the spool unevenly, and cause uneven stitches?
A: Sewing / Serging at a consistent, slower speed will help correct this problem. You could also use the spool nets provided with your serger machine.
Q: How can I overedge and gather fabric for a ruffle in one step?
A: This is very easy to achieve. Set the machine up for a 3 thread overlock, and increase the stitch length to 4.0. Next, set the Differential Feed Ratio to 2.25. If you need more of a gather, increase the needle tensions. The seam will automatically gather and finish the edge for an easy ruffle. There is also a gathering attachment available to allow you to sew two pieces of fabric together leaving one piece straight and the other piece gathered.
Q: I’m using my Pro 4DX serger to make scarves. I’m using the rolled hem feature with 3 threads and wooly nylon thread. When I start serging on the beginning edge the first 1/8″ – 1/4″ of my fabric does not get hemmed. It is unfinished as if the thread just didn’t catch that part of the fabric or it was pulled away. How can I prevent this from happening?
A: The problem is that your scarf fabric is very fragile, and while getting started it wants to pull away — and does! Try this: Start serging on a double layer of water soluble stablizer in front of and slightly underneath the beginning edge of your fabric. The seam starts to roll in its formation, and by the time it reaches the edge of the fabric it is holding on to the fibers rather than fraying away. Also make sure you have the blade OUT enough. There needs to be sufficient room to form a seam which rolls, and often a sewer has the blade in too far, and the fabric doesn’t have room to roll before it is cut off.
Q: I am trying to make a broomstick skirt on the serger. How can I achieve ruffling on one layer of fabric while attaching it to a second layer of fabric?
A: Janome serger machines make this task simple, fast and precise. Try the Gathering Attachment. This attachment gathers the bottom layer of fabric as it is being sewn to the top layer without gathering the top layer of fabric. An arm on the attachment swings between the two layers, pressing the bottom layer against the feed dogs to gather, while the top layer floats free of the pressure. Fullness of the gathers can be adjusted to suit your taste.
Q: What is a Memory Craft 450E?
A: The Memory Craft 450E is an Embroidery only machine. It will only stitch out embroidery designs.
Q: What is the most current version of the Memory Craft 450E?
A: The most current version of the Memory Craft 450E is version 1.10.
Q: How do I determine which version is installed on my Memory Craft 450E embroidery machine?
A: You can determine the current version of all Memory Crafts by powering on the Memory Craft and reading the opening screen. The version is displayed at the lower right corner of the opening screen.
Q: Where can I get the latest version of the firmware for the Memory Craft 450E?
A: You can download the latest version from the firmware section of the Janome software updates page.
Q: What type of media is compatible with the Memory Craft 450E?
A: The 450E Embroidery machine is compatible with USB Flash Drives.
Q: Can the Memory Craft 450E be connected to your computer to transfer designs?
A: No, the 450E uses a USB flash drive to transfer designs.
Q: What design format can the Janome Memory Craft 450E embroidery machine read?
A: Jef or Jef+ are the formats that 450e Janome Embroidery machine can read from a USB flash drive.
Q: What size USB flash drive can the Memory Craft 450E embroidery machine read?
A:8GB or less.
Q: Are there lessons available for learning software for my Memory Craft?
A:Yes, Janome offers free lessons for our software. See the complete list on the Janome Software Lessons page.
Q: How much memory does the Memory Craft 450E hold within the machine?
A:The MC450E has 4MB of memory built into the machine.
Q: What type of storage media is compatible with the Memory Craft 9900?
A: The MC9900 is compatible with USB flash drives.
Q: I’ve saved Janome designs on the USB flash drive but my Memory Craft 450E does not read them, what am I doing wrong?
A: The USB flash drive must be formatted to the machine before use. Once it has been formatted, the JEF or JEF+ file must be put into the embf file folder for the Janome Memory Craft 450E to recognize them.
Q: What Janome software is compatible with my Memory Draft 450E embroidery machine?
A: Janome offers two software titles that are compatible with your 450E: Digitizer JR ver.5 & Digitizer MBX ver 5.
Q: How often should I change my sewing machine needle?
A: First, let us say that you should always match the machine needle to the thread and the fabric being used for the project. It is always best to test on scrap fabric before moving onto the project. As for how often to change the needle, there are varying opinions on this matter. We suggest every 8 hours of sewing or every project.
Q: Does the Memory Craft 450E have to be turned off to insert media?
A: No, the Janome Memory Craft 450E can be on or off when you insert the media. However, the Memory Craft 450E should not be turned on or off while it is writing data to the media. Powering off the Memory Craft while it is writing data will damage the media
Q: How do I access a design from my USB Flash Drive on my Memory Craft 450E embroidery machine?
A: Insert the USB flash drive into the MC450E & press the icon that has a file folder with an arrow coming out. Select the icon of the USB flash drive and open the embf folder. The designs are grouped by hoop size, so if you don’t see the design you are looking for, scroll to the next page.
Q: What additional hoops are available to use with my Memory Craft 450E embroidery machine?
A: The optional hoops for the MC450E are the RE20b (140mm x 200mm) & the ASQ18b Quilting/Magnetic clamp hoop (184mm x184mm)
Q: Where is the serial number for my Memory Craft?
A: The sewing machine serial number is located on the back of the machine on the silver tag. This tag also displays the model, voltage and how much electricity is required, where it was manufactured and if it is UL listed.
Q: Can I create wire edged ribbon on the Pro 4DX?
A: Wire edged ribbon can be created on the Pro 4DX using the Rolled Hem 3 stitch and a Cording Foot (200207108) Bridal Wire is recommended as it is wrapped with white fabric. This wire can be found in the bridal section of craft and fabric stores.
Q: What does the Trace Outline do?
A: The Trace Outline moves the needle in square outline over the perimeter of the design or if a basting option is selected, it will baste around the perimeter of the design for extra stability.
Q: How many other languages are available on the Memory Craft 450E?
A:There are 13 different language choices. stability.
Q: In the Set Mode, what does Reset all to defaults do?
A:When you press the YES key all settings will be restore to their original setting, except for the language.
Q: In the Set Mode, what does Format Built-in Memory mean?
A:By selecting Format Built-in Memory in the Set Mode, the machine will erase and reformat the sewing machine’s built in memory.
Q: What is the Standby timer?
A:The Standby timer is an energy saving mode for that will turn the display screen dark and turn off the light. Simply touch the display screen to resume sewing.
Q: My Janome screen is misaligned, how do I fix it?
A: To align your Janome screen, please touch the SET button > touch right arrow and touch YES for Touch screen calibration. Touch the cross hair markings as they are displayed.
Q: When I use my Janome MC15000 embroidery machine on bulky fabrics, such as sweatshirts, or fleece type fabrics, my embroidery stretches the fabric and becomes buried in the nap. Help!
A: Fabrics with a high nap require a stabilizer that will hold the fabric securely. An iron-on, tear-away stabilizer works well on the wrong side of the fabric. However, you should also use a water soluble stabilizer on top of your fabric to keep the thread from becoming buried in the nap.
Q: I try using the Janome cloth-setter and templates, but my designs are still “off” when I sew embroidery. Can you help?
A: The Janome Clothsetter provides the sewist with a very precise and easy way to place embroidery designs in a desired location on the fabric. Your problem may be that you’ve forgotten to calibrate your Clothsetter to your Memory Craft. It is vital to calibrate the Clothsetter to the actual machine with which it is to be used. This is a simple process which takes only a minute. Set up your Memory Craft for Professional Style Embroidery. Select the calibration pattern on your Memory Craft embroidery machine and insert a piece of stabilized woven fabric in Embroidery Hoop SQ14 (or which ever hoop it says to use when that pattern is selected). Attach the hoop to the carriage and sew the “callibration pattern.” When completed, remove the hoop from the carriage, but do not remove the fabric from the hoop. Attach the hoop to the Clothsetter. Bring the Janome Clothsetter positioning arm down on the fabric. Match the red lines on the arm with the sewn test pattern. If the marks do not match up perfectly, loosen the two screws on the silver plate. Move the hoop until all lines match. Using a long-handled screwdriver, alternately tighten screws. Your Clothsetter is now calibrated for your Janome Memory Craft Machine.
Q: What is a .JEF design?
A: A .JEF design is a design that is formatted specifically to the Janome protocol so the Memory Craft Embroidery machine can read and sew it out.
Q: I have an older Janome MC9000. When choosing a design from a Memory Card, I have difficulty judging how much space a design will take. How can I determine the size of a design before I sew it?
A: The Visual Touch Screen on the MC9000 will allow you to determine the size of any design on Memory Cards designated for the MC 9000.
Insert the Memory Card – turn Memory Craft on.
From Menu Screen – select the Edit Design Mode – refer to page 93 in the Instruction Book.
Select desired design.
Press the Edit Key – refer to page 93 in the Instruction Book.
Press the Grid Icon (located in the lower left corner of the screen).
A grid will now appear on the screen over the selected design. Using the plastic template from the Rectangular Embroidery Hoop included with the Memory Craft 9000, count the number of squares lengthwise and crosswise that the design covers on the Edit Screen. The template grid is proportional to the on-screen grid so that the actual size of the design can be determined.
Q: What is a JEF or JEF+ file?
A: A JEF or JEF+ file is a design that is formatted specifically to the Janome protocol so the Memory Craft can read and stitch it out.
Q: I have an older Janome Memory Craft embroidery machine that uses memory cards. How can I mirror image Memory Card embroidery designs?
A: Most Memory Cards designs can be mirror imaged. In order to achieve satisfactory results some modifications need to be made to the thread tensions for the needle and bobbin. There are two different ways to do this: 1. Adjust the needle tension to 8.6 for the Memory Craft 9000, 5700 or 5000. For the Memory Craft 8000, adjust the needle tension to 8. 2. For this modification, it is recommended that an extra bobbin holder be purchased. Located on the side of the bobbin holder is a small screw. Using a toothpick and a dab of bright colored nail polish, place a mark on the tension screw and on the bobbin holder directly across from each other. This mark represents the manufactures recommended tension setting. Turn the tension screw counter-clockwise 3/4 of a revolution. Note: Keep this extra bobbin case for mirror image embroidery and reverse bobbin work. When sewing mirror image embroidery you will be sewing on the wrong side of the fabric. Place the fabric in the Embroidery Hoop, with tear-away stabilizer on the top and water soluble stabilizer on the bottom. This will be the exact opposite as to what is normally done. Wind bobbins with the thread colors recommended for the design that has been selected or choose your own. Because you are sewing upside down, when a thread color change is required, the bobbin thread and top thread will both need to be changed. To change the bobbin thread, simply remove the Embroidery Hoop from the carriage and change the bobbin to the new color. Use the tension settings given as a guideline depending on the fabric and thread that is being used.
Q: How do I use skip parts of an embroidery design on my Janome Memory Craft embroidery machine?
A: On most Janome Memory craft embroidery machines (MC15000, MC9900, MC500E, MC450E), To skip an embroidery segment or color, simply press the page turning icon until you are at the segment you wish to sew.
Q: The outlines of my embroidery design don’t line up next to the body of the design. Is there something wrong with my Janome Memory Craft embroidery machine?
A: Your Janome embroidery machine is fine. When the outline stitching does not match the body of your design, check two things: your hooping and your stabilizer. Your fabric must be taut in the hoop for correct stitching. Make sure that the screw that holds the inner part of the hoop is tightened sufficiently. A very common oversight made by sewists is not using enough stabilizer. The stabilizer supports the fabric, allowing the thread to form the design. Without enough stabilizer, the threads can distort the fabric. When embroidering a densely stitched design, the fabric may require more than one layer of stabilizer. Fuse a layer of iron-on tearaway to the wrong side of the fabric and place in hoop. Then, before beginning to sew, place tearaway stabilizer between the hoop and the feed dog. Some fabrics may require several layers of stabilizer. To increase the coverage of the outline, place two threads of your outline color in the needle. Another option for Memory Cards, starting with #101, is to stitch your outline twice. After inserting your Memory Card, select the outline as the first color to sew. Sew the outline. Then, start the design over again, and sew all the colors in their standard order. You will then end up with two layers of outline stitching. The basting feature found in the trace outline function on newer Janome Memory Craft models (MC15000, MC9900, MC450E ect) will also help this problem.
Q: Can I embroider multiple patterns in the same hoop area?
A: Yes. On any newer Janome Memory Craft embroidery machine (MC15000, MC9900, MC500E, MC450E) you can combine embroidery patterns as long as you are in the edit mode.
Q: When sewing on lightweight fabric, I have trouble with the seam puckering. What can I do?
A: Lightweight fabric can sometimes create difficulties. Try some of the following suggestions.
- Change to a size 9 fine needle.
- Shorten the stitch length to between 1.5 to 2.0 (normal is 2.2).
- Use a straight stitch foot. This foot has a flat bottom and a single needle hole in the center of the foot. This will help support the fabric around the needle to prevent puckering.
- To further support the fabric, try a straight stitch needle plate.
- It may also be necessary to loosen the upper thread tension.
Q: How fast can the Memory Craft 9900 sewing / Embroidery machine sew?
A: The Memory Craft 9900 can sew 1000 SPM. (Stitches per Minute)
Q: I have an older Janome Memory Craft that uses the Memory Cards. How can I make my own Memory Card templates on transparencies?
A: There are two methods for making transparencies. Method 1: Embroider one design from the Memory Card from which you wish to make templates. Take the pictured inner liner that came with the Memory Card to a copy machine and increase the size to approximately 270% (this will vary with each card). Print the design you embroidered and check to see if it is the exact size, and increase or decrease the size on the copy machine until the printed design is the exact size of your embroidered one. Once the size is the same you can simply copy the inner liner on transparencies to make your own templates. Method 2: Embroider your design on a piece of stabilized test fabric. With the embroidered design still in the hoop, stitch the placement patter on top of the design. The placement pattern is number 48 on Memory Card 102 and is the last design on all three-digit memory cards. Place a transparency over the embroidered design and placement pattern. Trace the lines of the design, the circle and cross. Draw an arrow at the top of the design, which will indicate the direction for placing your project in the hoop. Write the number of the design and the memory card number on the transparency. This will help you organize your templates; as well as recognize the front of the transparency.
Q: When I do professional style embroidery, the fabric often puckers, or the outline of the design doesn’t meet the design precisely. I am using a tear away stabilizer underneath the hoop. What can I do to correct this problem?
A: This is a very common situation. Even though you are using a stabilizer, it is not adequately stabilized. Try an iron-on tear-away stabilizer ironed on the back and put into the hoop. Occasionally another layer or two of stabilizer is also placed under the hoop. (Tear these off one layer at a time.) With a stretchy knit shirt or terry cloth, we sometimes also add a water Soluble layer on top! When you are embroidering a design with very dense stitches-the fabric shrinks, hence you get Puckers, or the outline stitches don’t line up. Using the smallest hoop possible will give the best results. You will find the basting option available on the newer Janome Memory Craft Embroidery Machines (MC15000, MC9900, MC450E) very helpful for this problem as well.
Q: Is it absolutely necessary to use only Janome bobbin thread in the bobbin for memory card embroidery, or can I use any standard sewing thread?
A: You should not use standard sewing thread in the bobbin, as it may not be the correct weight for machine embroidery. Superior stitch quality is achieved with Janome bobbin thread. The weight of the Janome embroidery thread, was designed specifically for embroidery. This thin, smooth, strong thread is the correct weight to use in the bobbin, with Janome Embroidery thread in the needle, for a balanced stitch and professional looking machine embroidery. The incorrect weight bobbin thread can cause the bobbin thread to show on top of your embroidery.
Q: I’m using an iron-on tear away stabilizer when I embroider on lightweight sweatshirts, but they still seem to stretch when stitched. Any suggestions?
A: An iron-on stabilizer is recommended when embroidering on sweatshirts, however they come in several weights. It is best to use the heavier weight iron-on, and in addition use a layer of water-soluble stabilizer on top of your sweatshirt, within the hoop. The use of an iron-on interfacing, ironed on with the grain in the opposite direction of the shirt is also very helpful when embroidering on knits. When using an iron-on stabilizer the fabric can not shift or stretch, making it easier to embroider on and with the use of an iron-on interfacing you will have no stretch or puckers when you embroider. If you have a newer Janome Memory Craft model (such as the MC15000, MC9900, MC500E, MC450E ect..) There is a basting feature that can be found from the trace outline. This is very helpful in keeping the fabric from stretching out of shape.
Q: I’ve followed the directions for calibrating my Clothsetter, and have used it many times with perfect placement. But lately my placement has been inaccurate. Why has it changed?
A: The Clothsetter is calibrated by adjusting the two set screws under the placement arm. As you continue to use the Clothsetter it is possible for those screws to loosen and shift even though you have secured them properly. This occurs gradually with normal handling and is not a defect. Therefore it is advisable to regularly recalibrate the Clothsetter, especially before you are doing critical placement, such as joining designs to create a larger image. TIP: Using a long handled screw driver provides better leverage for accurate adjustment..
Q: I am trying to do Professional-Style Embroidery on baseball Caps. I just can’t seem to get the hat in the Embroidery Hoop correctly. Is there an easier way?
A: There is a Hat hoop insert available for most Janome Memory Craft Embroidery machines (MC15000,MC450E ect). This will make stitching out embroidery on baseball caps quick and easy.
Q: I have an older Memory Craft embroidery machine that uses the memory cards. How can I memorize and stitch more letters when using Memory Card #101 in the Ordinary Embroidery Mode? I can see there is more room available to stitch in the hoop, but the machine will not accept any more letters into memory.
A: Adding letters is easy once you know a couple of tricks. To add more Letters in the hoop follow these instructions: 1. Select the NORMAL EMBROIDERY MODE. 2. Select the Block Style Letter Mode-Medium size. 3. Place into Memory “ABCDEF”. 4. Press the Space Check Key in the upper right-hand corner of the Visual Touch Screen. 5. On the Positioning Screen you will see a rectangle. The rectangle represents the amount of space the letters you have just placed into Memory will fill. Besides the amount of space, the rectangle gives other useful information.
Notice the notches on the inside of the rectangle. These notches indicate the number of characters you have placed into Memory. Notice that all of the spaces are not the same size.
There are also two notches on the outside of the rectangle. These represent the center of this rectangle.
The “DOT” in the lower left corner of the rectangle is the starting point for sewing.
When the arrows to the right of the screen are pressed, the rectangle moves up or down or sideways . Press the arrows to move the rectangle to the top and left of the screen. Press OK to return to the original screen. 7. Place some fabric in the Rectangle Hoop. Place the hoop on the carriage. Lower the presser foot and sew. To Add More Letters To The Row, We Will Use Two Tricks 1. Leave a 2″ to 3″ thread tail in the fabric. This thread tail is necessary to know where to insert the needle to start sewing the next letter. 2. Press the Space Check Key. 3. Next you will need to program in spaces to represent letters. The number of spaces depends on how far over you need to move the next letter or design. You will want the “G” to start 9 ¼ grids from the left. How did we know that? 4. The “ABCDEF” that was just sewn is displayed by a rectangle on the Positioning Screen. 5.Located in the lower left corner of the Positioning Screen is a picture of a Grid. Press the Grid and it will be displayed over the letters. 6.Place the Template that came with the Rectangle Hoop in the hoop. Notice where the last letter is sewn and the thread is coming out. Not counting the first ½ grid, count the grids on the template. You should come up with 9 ¼ grids. To get the next letter “G” in the correct position to sew you must place spaces in memory before the letter. 7. Press OK. 8. There are two different size spaces available. The small space is the same Space Key used when memorizing spaces between words. A larger space is located on the next screen. Press the Next Page Key. The larger space is located in the last row, the last block. 9. Clear the letters previously sewn. NOTE: Once these letters are cleared, the rectangle on the Positioning Screen is also cleared. 10. Press the Large Space Key and put into Memory twice. Press the Space Check Key. You should see a very thin rectangle. Press the picture of the Grid. The Grid tells us that the large space in medium letter size is 3 ¾ grids across. We need to go to the 9 ¼ grid mark. Press OK. Press Memory once again. Press the Space Check Key, we now have 7¼ grids, still short. 11. Press OK. Press Memory to memorize a third large space. Press the Space Check Key. Now we have gone too far. Press OK. Press “C”, clear to delete one large space. Press the Previous Page Key. Select the small space and put in Memory. Press the Space Check Key. The arrows will allow you to move the rectangle over until you have 9 ¼ grids. 12. If this combination of spaces was not far enough you could try using small spaces instead of large spaces. Press OK. Next, select “G” and place in Memory. 13. Start sewing the “G”. The spaces will sew first and then the “G”. 14. The “G” should have sewn exactly in the correct position.
Q: I have an older Memory Craft embroidery machine that uses the memory cards. How can I memorize and stitch more letters when using Memory Card #101 in the Edit Design Mode (ABC+)? There is more room in the hoop, but the machine will not accept any more letters into memory.
A: Adding letters is easy once you know a couple of tricks. To add more Letters in the hoop follow these instructions. 1. Select the EDIT DESIGN MODE 2. Press the Block Style Letter Mode. Select medium size letters, upper case. 3. Place in memory JANOME. How many letters were you able to Memorize? Four-JANO (the “M” is showing on the Visual Touch Screen but not memorized). 4. Press the Edit Positioning Key. You should see a rectangle. The rectangle represents the amount of space the letters you have just placed into memory will fill. Beside the amount of space, the rectangle gives other useful information. NOTE: If the Edit Screen is not clear, press the “C” to clear.
Notice the notches on the inside of the rectangle. These notches indicate the number of characters you have placed into Memory. Notice that all of the spaces are not the same size.
There are also two notches on the outside of the rectangle. These represent the center of this rectangle.
The “DOT” in the lower left corner of the rectangle is the starting point for sewing.
When the arrows to the right of the screen are pressed, the rectangle moves up or down or sideways. Press the arrow to move the rectangle to the top and left of the Edit Screen. Press OK to return to the original screen. NOTE: You will need to draw a line across the fabric where you want the letter to be sewn. This will ensure it is correctly lined up in the hoop. 6. Place some fabric in the Rectangle Hoop with the line on the fabric lined up with the crosshair on the Clothsetter. 7. Place the hoop on the carriage and press the arrows until the needle is over the drawn line on the fabric. Pressing the left arrow move the rectangle all the way to the left. Lower the presser foot and sew. 8. Press “C” to clear all the letters. 9. Next you will need to program in spaces to represent the sewn letters. The number of spaces depends on how far over you need to move the next letter/letters or design. This is easy because the rectangle has been frozen on the Edit Positioning Screen. Press the Edit Positioning Key and view that your rectangle is still there. Press OK. 10. There are two different size spaces available. The small space is the same Space Key used when memorizing spaces between words. A large space is located on the next screen. Press the Next Page Key. Select a large space and memorize. 11.Press the Edit Positioning Key. Move the narrow rectangle to the right. You need to place spaces into memory until the spaces reach the end of the rectangle. It looks like it fits. Press OK. Press the Previous Page Key. NOTE: If the memorized space/spaces were not enough, return to the original screen and add more. If too many spaces were memorized, return to the original screen and delete some. 12. Place “ME” into Memory. Press the Edit Positioning Key. Press the arrow to move the rectangle to the right until the end of the programmed large space lines up with the end of the sewn rectangle. You are now ready to sew “ME” NOTE: The Edit Design Mode has one large advantage over the Ordinary Embroidery Mode — the ability to freeze, combine and edit Memory Cards on the Visual Touch Screen.
Q: I have an older Memory Craft embroidery machine that uses the memory cards. When I used Memory Card #117 the border sewed over my letters. What am I doing wrong?
A: Sorry you had a problem. When embroidering with Memory Card #117 in the Memory Craft 5000 or 5700, use the following instructions for programming and sewing:
Program in the first letter and memorize by pressing M on the Touch Pad. Notice that there are three symbols under each group of the three letters and that the first symbol is highlighted.
NOTE: Located in the upper right corner of the Visual Touch Screen are three symbols — the first is a hoop with numbers beside it representing the Embroidery Hoops suggested. Next is pO1 which represents the page number of the screen that you are on (there are 14 different screens) and last is a spool of thread with an arrow on it which tells you, when highlighted by pressing, that the machine will stop after sewing each letter so that you can change the thread color.
Page forward to page 4. The alphabet will start over again and the middle symbol under the letters is highlighted. Program in the middle letter and memorize.
Page forward to page 6. The last symbol is highlighted. Program in the last letter.
Sew the letters. When sewing has been completed, delete the memorized letters by pressing the C (clear) Key on the Touch Pad.
If you wish to sew a border around the letters, select from one of the four borders available by going back to page 2 or 3. Select the border of choice and memorize.
NOTE: When the border is pressed once a 3 appears under the border design. When the same border design is pressed again a 2 appears under the pattern. Be sure to select the 3 if you have stitched a 3-letter monogram or a 2 for a 2-letter monogram.
The same method for sewing is used for letters that are diamond shaped for escutcheon.
Q: I have the Janome Spool Stand and I’ve lost the little thread guide. Can I replace just the small thread guide ?
A: Yes, it’s available through our store / Toews Sewing or your local Janome Dealer.
Q: With so many different types of embroidery stabilizers to choose from, are there any rules for which one is best for different types of fabrics and techniques?
A: Just like sewing with a good quality thread and needle, to achieve professional sewing results when using Janome embroidery machines it is important to stabilize the fabric. When the designs are sewn without the proper stabilizer, unsatisfactory results may sometimes occur. In some cases the thread can be “heavier” than the fabric, causing distortion in the design. There are many different types of stabilizers available and most of them are excellent. Three of the most popular types of stabilizers are tear-away, iron-on and water-soluble. To determine the correct type and the number of layers of stabilizer your project requires, it is recommended to test sew the embroidery before beginning your project. The water-soluble stabilizer may be placed on the right and/or wrong side of the fabric. It eliminates bulk and “whiskers” that are left by tear-away stabilizers. It is used where both sides of the project will be seen when sewing is completed, such as terry cloth. It can also be used on the top of the fabric where the threads may “sink” into the cloth, such as fabrics with nap (velvets and corduroy). Remember that this stabilizer is removed with water so do not place on fabric on which water can not be used. Iron-on and tear-away stabilizers are the most popular. Even combining the two will give great results. These types of embroidery stabilizers are only used on the wrong side of the fabric. After the stitching is completed, the excess stabilizer is removed, but the stabilizer under the threads remains. It will not be removable even after several washings. Sometimes, several layers of embroidery stabilizer may be required to achieve professional results. Note: If the project requires a heavyweight tear-away stabilizer, try using several layers of lightweight stabilizer instead. It is much kinder on the threads when removing the excess. Lightweight fabrics presents the problem of the thread being heavier than the fabric. You must add volume to the fabric with stabilizer to support the weight of the thread. Try using one layer of iron-on and 2 to 4 layers of tear-away. If the fabric is not only lightweight but also sheer, you may need to try several layers of water-soluble stabilizer on top of the fabric and a tear-away underneath. Depending on the embroidery design selected to be sewn, spraying the fabric with spray starch or spray sizing can be enough for beautiful results. For medium weight fabrics, try one layer of iron-on and 1 to 2 layers of tear-way stabilizer. For heavy weight or very dense fabric, one layer of either iron-on or tear-away is probably all you will need. When your project has stretch, it may be necessary not only to stabilize but also to interface the stitching area. A good interfacing to have on hand is lightweight fusible knit. Place the stretch of the interfacing going in the opposite direction to the stretch of the fabric and then stabilize. There are also two fairly new embroidery stabilizers on the market that are paper-backed release adhesive sheets. One is a tear-away and the other is water-soluble. The inner hoop of the embroidery hoop is not required. The stabilizer is “stuck” to the outer hoop and the fabric “sticks” to the stabilizer. This is perfect for collars, cuffs and other small projects where it is difficult to get the project in the hoop. This type of stabilizer is also great for fabrics that may be harmed by “hooping.” Give one of these suggestions a try for better looking Professional-Style Embroidery.
Q: On my Memory Craft embroidery machine, sometimes I can fit a lot of letters in the hoop and sometimes I can only get a few in the hoop. What am I doing wrong?
A: On most Janome Memory Craft embroidery machines (MC15000,MC9900, MC450E ect), There are 3 different sizes of letters built into the machine. Using a smaller size, you will be able to fit more letters in the hoop. It also depends on what hoop you have selected. Try changing to a larger hoop if you want to program more letters. You also have the option to have the lettering vertical in the hoop, so if you have a rectangle hoop, you will be able to fit more lettering in the hoop vertically.
Q: Both my friend and I own Memory Craft 9000s. I use the Clothsetter and get perfect placement. My friend borrowed my Clothsetter but she did not get the same satisfactory results. Why would we have different results with the same Clothsetter?
A: Both the Clothsetter II and III are compatible with the Memory Craft 9000, 5000 and 5700. However each machine is unique.
You can use the same Clothsetter for several machines, but you will need to recalibrate the Clothsetter for each machine used. You will need to stitch the test pattern from the machine currently being used to recalibrate the Clothsetter for satisfactory results. Because of the slight variations from one machine to another it is more advisable to purchase separate Clothsetters.
Q: How do I make a comma with Memory Card #101?
A: 1. Select the letters you wish to sew and select a small space where you need the comma. 2. Press the Edit key and clear the screen of all previous embroidery patterns. 3. Press OK. Sew and complete your lettering. 4. Clear all the letters. 5. Select the number of spacers you will need to move over to the small space. 6. Page over to the European mode and select the apostrophe. 7. Press the Edit key and press the directional arrows to lower the rectangle on the edit screen, moving the apostrophe down to where it becomes a comma. 8. Press OK and sew.
Q: I’ve seen the Janome Thread Spool Stand at my dealer’s store. When would I use this accessory?
A: The Janome Thread Spool Stand gives you a simple way to organize your various thread colors in the order you’ll need them for embroidering designs. And the stand makes it easy to repeat designs without color confusion.
Also, many threads benefit from a vertical delivery system because of the way they are designed to unwind from the spool. The extra guide on the top of the stand, and the one mounted in the auxiliary spool pin holder, provide supplemental guidance for unruly threads.
Buying threads on bigger cones is much cheaper than buying the small spools as well.
Q: I am sewing light colored lettering on a heavy dark blue fabric and the fabric is showing through. What should I do?
A: Try using two threads through the eye of the needle instead of just one. Remove the extra spool pin from your accessory storage area and place it on the auxiliary spool pin holder. Thread the machine, one thread at a time. A #75/11 Blue Tip needle is normally recommended for Professional-Style Embroidery but depending on the weight of the base fabric, you may need to use a #14 Topstitch needle. Always test sew a sample before sewing on your project.
Q: I love heavy decorative cords for couching, but I can’t always find them in the colors I want. Is there an easy way to make my own?
A: You can create all sorts of wonderful cording trims with the Hemmer Foot 2mm D or Hemmer Foot 2mm D (front loading machines), included with nearly every Janome machine. Choose several thicker threads, such as: Pearl Crown Rayon, Designer 6, Candlelight or even yarn. Thread your machine with matching threads in the needle and bobbin. Place the threads in a bowl on the floor. Attach Foot D to the machine. Choose the zig-zag stitch (width 5, length 4). Twist the threads together and pull them through the twisted part of the foot. Pull the threads under the foot toward the back of the machine. You will not have any fabric under the presser foot. Lower the foot and stitch. You’ll be amazed at how quickly you can create a designer cord. Try different stitches, widths and lengths for unusual effects.